Saturday, November 30, 2013

a tale of two boys: the arrival of abigail's twin brothers

tonight has been an evening of great reflection
tonight Jani and Jesse
champion parents to our sweet miracle baby Abigail
were once again brought to that moment of greatest anticipation
the birth of their child
and this time the anticipation was doubled
with the birth of twins
twin boys

i know they have been beyond elated to have two new additions to their family
but i can only imagine what entering that hospital felt like to them
did that overwhelming feeling of anticipation become dimmed by a rush of fear
i dare say that it may have
i know i would have let it creep in uninvited

for those of you who have joined our little community within the past two years
you may not be familiar with the story of little Abigail and the fight for her life
born with part of her heart missing
her heart backwards
and on the wrong side
to be then reconstructed several times within such a short period of time
the waiting
the wondering
the holding of ones breath for great lengths of time
i know so many of you journeyed with me
and like me lived from moment to moment on updates regarding her surgeries, setbacks, and recoveries

hers is a story of courage and miracles
fought not only within her own little soul but within that of her valiant father and mother
for many long months

to watch a video i made of the beginnings of her life including that heart wrenching life flight
come visit here
to read more of her journey over those months click here or on the 'abigail' link in the sidebar

this is a family of warriors
tonight two strong boys joined Abigail as children to my fine brother and his superhuman wife
enduring nearly two days of intense labor
jani fought hard to deliver both of her boys naturally
extreme back labor caused an epidural to be necessary at the end of day one
the position of both of the boys allowed for the need for a c-section to be kept at bay
long did she labor
finally help was given for her labor to progress
but it did not
at least not at all in a manner i would deem real progress
slowly it continued
despite the strong contractions

at last this afternoon baby boy one arrived into this world
nicknamed Flex by his grandpa
with his brother baby boy two, nicknamed Blaze, still rather high up
Flex and Blaze
that's how we have known them
little Flex weighed a healthy 5 lbs 1 oz
and looks so much like my brother Jesse i just love it
he arrived doing well
no surprises
he would soon be named
Thomas Russell Dix
a fine name don't you think


i have never experienced a double birth
but i can imagine the sort of mix of emotions
having delivered pure joy after such tribulation
only to have to continue to push and toil once again
for jani this pushing and laboring lasted hours more
to the point where jani just didn't know if she could last much longer
as i am sure you may surmise this woman is one of absolute stamina, faith, and courage
unfortunately Blaze was larger than Thomas and got stuck in the efforts to be delivered
so a c-section was needed
much to jani's dismay
but i know her heart was only directed toward doing what was best for her babies

a time of communication darkness ensued between those there at the hospital and myself
it is ever so difficult to be so far away from my family during moments such as these
during Abigail's birth, surgeries, and fights for her life
i was in california while they were in utah
this time i am the one in utah and they are in california

the next text message i received told me that Blaze was born but was whisked away due to breathing difficulties
my brother was beside himself
i have no doubt that the memories of Abigail's birth flooded his mind
emotions mixed with experiences mixed with logic mixed with faith
all whirling around inside
i could visualize his facial expressions and his stance in my mind
i will say of my brother that he feels the pain of others like no one i have ever known
he feels what they feel
he takes them upon himself

once again a stretch of a communication void
but then there appeared across my phone screen the most beautiful words and photos
the babies were both breathing on their own
both on their own
and daddy and grandma were holding them
jani was in the recovery room resting peacefully

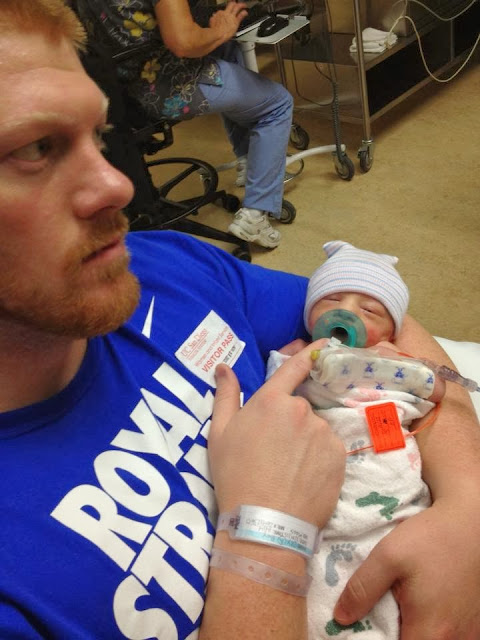
here is jesse with Thomas Russell
and our first glimpse at Blaze...to be named soon


i think i breathed for the first time

and now i am happy to present the first moments Jani was able to see and hold her babies
Jani is the champion of the world
Movember Jesse looks much more worry free
i am so grateful for the miracles that continue to happen in this family
we are continually blessed with watchful heavenly care
and i have no doubt that daddy is able to be close by for occasions such as these
how i wish these little ones could pass on messages from him

photos below:
Jani and Jes with Thomas Russell {baby one}
with Baby Blaze {baby two}
Baby Blaze
Baby Blaze
Thomas Russell whom I can see a lot of Jani in him now
Thomas Russell


i can not wait to see the whole family together
thank you family and friends once again for lifting us up in your prayers
it is an incredible feeling to be surrounded by an army of prayers from those who care for and love you
it is nearly tangible
as it has been many times before
thank you
thank you

Friday, November 29, 2013

blue christmas blog hop: mantles


awww life has a habit of throwing things in the mix that you just didn't plan on
like all four of my children coming down with a nasty bug the week of Thanksgiving
thankfully we recovered and most notably without mike or i coming down with it
knock on wood
mike has his second treatment for his new MS medication next week
so being bugfree for him is an absolute necessity

but alas i was not able to contribute myself this week to the wonderful
Blue Christmas Blog Hop
for decorating mantles

above is my darling friend Amy from Commona My House's contribution
be sure to check out all the other bloggers this week
for their fabulous ideas on incorporating blue into your Christmas decor


Friday, November 22, 2013

radiator grate ornament holder diy tutorial: a blue christmas blog hop

radiator grate Christmas ornament holder with silhouette welding letters diy tutorial

hello again from the Blue Christmas Blog Hop
welcome to all my new readers from around the blogosphere
to see week#1 ornament collection from our lovely bloggers, visit here

this week is wreaths and wall decor
i was inspired by my favorite globe ornament to find a way to highlight it in a non-traditional display
an so the idea of the radiator grate ornament holder began
combined with a fabulous lesson on how to use the welding option on my silhouette cameo

supplies for Christmas ornament holder

radiator grate and frame

SUPPLIES

high quality glitter paper
a few of your favorite ornaments
jewelry chain
jump rings
jewelry pliers
ornament hangers
tiny hole punch
adhesive dots
radiator grate {i found mine at home depot}
metal sheers
painted frame
metal picture back holders {i found mine in the framing section of michael's}

CUT

using your metal sheers, cut your radiator grate to fit perfectly inside your frame
it feels pretty powerful slicing through metal like its nobody's business


cut radiator grate


SECURE

secure your radiator inside of your frame using metal picture back holders
i placed mine about every 4 inches or so using a putty knife


framed radiator grate


SILHOUETTE WELDING MAGIC

i followed this amazing tutorial on welding letters on your Silhouette by findingnana
my mind was blown at how many uses i could have now for welding letters
you will be floored at how easy it is
i chose to but the reason back into Christmas and typed the words
rejoice He is King

i had to use a little spray adhesive on the back of the glitter paper to get it to secure to the Silhouette cutting mat
i put my blade on the highest setting and it did beautifully
be sure and do a test cut first


welding letters with silhouette cameo
rejoice he is king

ATTACH

measure how long you want your wording to hang on your radiator grate and then cut accordingly with your metal sheers
using your tiny hole punch place two holes on opposite sides of your wording
with your jewelry pliers open your jump rings and place inside the hole
attach one end of the chain inside the ring and close
repeat for the other end
place an ornament hanger at the center of the chain

jewelry making supplies for radiator grate Christmas ornament holder
rejoice he is king merry christmas

HANG

hang your wording in the center of your framed radiator grate
i applied a few adhesive dots behind the wording to provide extra stability
hang your ornaments
and drape your Christmas lights over the top corners

framed radiator grate Christmas ornament holder diy tutorial
hang your favorite ornaments
Christmas ornament holder
framed radiator grate Christmas ornament holder diy tutorial

LIGHT UP

plug in your lights for that added holiday cheer
simple and fun
early Merry Christmas everyone

radiator grate Christmas ornament holder with silhouette welding letters diy tutorial

christmas lights on radiator grate

don't forget to hop on over and see these other fabulous ladies' 
blue christmas wreaths and wall decor

Krista @ The Happy Housie
Amber @ Averie Lane
Rachel @ Maison de Pax

blue christmas blog hop

Friday, November 15, 2013

plasti-dip pine cone ornament tutorial: a blue christmas blog hop


ever since i came across this tutorial when planning for craft explosion two years ago
i have been wanting to play with plasti dip
the enticement of taking something rather ordinary
and creating something more resembling a work of art
has remained in my mind all this time
when i was invited to be a part of the Blue Christmas Blog Hop with Amy from Commona My House
i knew exactly what i wanted to try
since the regular can of plasti dip was a little out of my price range
i decided to try my hand at the spray version
i didn't know what to expect
what i discovered was something rather fun


SUPPLIES
something ordinary like pine cone picks from the dollar store
spray plasti-dip {i purchased my from home depot in the paint department}
glitter in varying textures

PREP WORK
you need some serious ventilation when working with this stuff
be sure to lay down paper or plastic to protect your surface from overspray
you will get a major workout shaking this can until you hear the metal ball rattle around before spraying
be sure to stay about 12" away while spraying

SPRAY
wait a minimum of 30 seconds between coats

COAT 1


COAT 2


COAT 3


GLITTER
sprinkle your glitter on top following your third coat of plasti-dip


COAT 4


DRYING TIME
four hours of drying time is recommended before use


RESULT

the transformation of an ordinary pine cone was complete
the four coats of plasti dip dried fairly translucent
not quite as white as i was hoping
but i love how the glitter seems to have crystalized inside the medium

i am happy with the way they turned out
and it has sparked a greater interest to try another object
to try maybe letting the coats dry longer in between
to try not shaking the can as long as it says to so it doesn't spray as thin
to add more coats

i would love to hear what you would plasti-dip
have you tried the spray kind before?
chime in with any tips or experience you have had

BLOG HOP

be sure to check out these fabulous blogs
and their Blue Christmas Ornaments
hop on over and tell them hi from our Sweet Dreams are Made of These readers

Wednesday, November 13, 2013

hipster baby first birthday cake bunting tutorial

hipster baby boy first birthday cake bunting

i decided a cake bunting was a must
whether there was a cake or not

here is a quick overview of how to create your own hipster baby first birthday cake bunting

i utilized the SUPPLIES they provided us
bakers twine
aqua ribbon
patterned paper

and added a few elements of my own
bamboo skewers
solid colored paper
styrofoam circle

tassel making tutorial

TASSELS
wrap your baker's twine around a piece of cardboard at least a dozen times
the more wraps, the thicker your tassel
carefully slide the cardboard out whilst holding onto one end of the wrapped twine
wrap another piece of twine around that one end multiple times to create the top and tie off
cut the bottom folds of twine in half
make three tassels


tassel making tutorial

RIBBON 
double knot your ribbon around one skewer
then double knot the end to the other skewer
leaving some slack in the center


silhouette cameo feathers

FEATHERS
cut feathers into varying colors of solid colored paper
i used this set of cut images for my silhouette cameo
the smallest size was perfect for this bunting
you can also trace a pattern or use other die cuts
choose five feathers of varying colors


hipster baby boy first birthday cake bunting

NUMBER ONE
cut a number one out of your patterned paper
i like how this little guy turned out looking quite fish shaped
like a little brave's fresh catch hanging on the line

TIE ON
carefully tie the ends of your feathers with the baker's twine
begin tying on your tassels and feathers onto the ribbon
i choose to tie the tassels on separately than the feathers


hipster baby boy first birthday cake bunting tutorial

GROUP
gather your feathers, tassels, and number one in groups of three evenly spaced out along the ribbon

feather and tassel birthday cake bunting tutorial

STICKS IN
if you are privileged to actually have a cake and not just a sorry excuse for one
press your skewers into the scrumptious surface of the cake
til candle lighting time

happy bunting making friends

LinkWithin

Related Posts Plugin for WordPress, Blogger...